DIY - Lighting Up Your Easter Bunny Garland
Whether you’ve got little one’s that will love getting crafty over the Easter break or you’d just like to add an Easter feel to your home, our lit up bunny garland is the perfect DIY. We’ve popped together a guide of what you’ll need and how to bring you bunnies to life!
What you'll need:
Coloured Card
Bunny Stencil
Pom Poms
Mini Pegs
Pencil, Scissors & Glue

Step 1 - Make your bunnies!
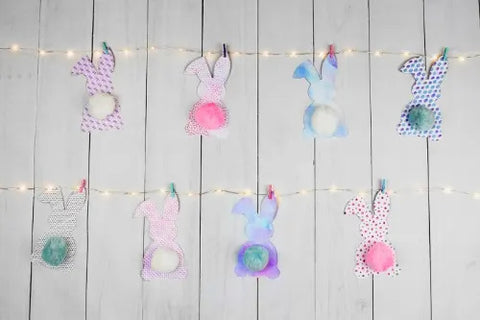
The first step is to make your bunnies! For this you will need the card, a stencil & scissors. You can make these any size or shape you like, either free hand draw your own or find a stencil online of a bunny. Simply trace onto the card and cut them out. We went for 8 bunnies on pastel coloured patterned card to fit in with the Easter theme.

Step 2 - Pom Poms
The second step is our favourite - adding the pom poms! Although this step isn’t essential, we think it completes the garland and adds a little fun. Take your pom pom’s, whatever colours & sizes you have chosen, and add them to your bunny! We've used a glue gun, however they can easily be stuck on with any glue so whatever works for you - a glue stick or PVA may be best around little hands.

Step 3 - The Lights
Hang your seed fairy lights up on the wall where you would like them. We recommended doing this with the lights illuminated and making sure they are secure before adding on the bunnies. Take your pegs & attach the bunnies to the lights making sure to space them out for your desired look! As the seed light wire is really thin and flexible, it makes it super easy to attach the bunnies. We’d recommend mini pegs as they secure the bunnies whilst also looking subtle!

Garland complete!